Welcome to the tutorial Waalaxy synchronized with SalesForce !
Our auto-import feature allows you to retrieve data from Waalaxy, you can export this data to other CRMs via a Zapier integration. Want to automatically transfer the retrieved data to your Salesforce CRM? It’s this way! ⚡ 
Salesforce is a cloud-based customer relationship management (or CRM) solution that gives all departments in your company – including marketing, sales, customer service, and e-commerce – a unified view of your customers on an integrated platform.
It’s clearly the world leader in cloud CRM and offers many advantages: flexibility, adaptability, standard API links, an infinite number of options with multiple applications, and many more!
Do I need a paid subscription to create Zapier Webhooks?
No. You will need a paid subscription to Zapier, or the trial version to be able to create Webhooks.
You will also need a paid subscription, Advanced or Business on Waalaxy to create Webhooks.
Link of the Waalaxy x Salesforce
I’ve prepared the Zaps for you that you’ll just have to copy / paste into your browser to automatically resume the pre-completed Zap.
So happy?
➡️ Zap Synchronization Waalaxy x Salesforce
Step 1. Go to Zapier
- Click on “Create a Zap”,
- Search for “Webhook by Zapier”,
- Under “Event”, select “Catch Hook”,
- Click “Continue” twice, skipping the “Pick off a Child Key” part,
- Copy the webhook URL.
Step 2. Go to Waalaxy
- Click on “Campaign” and “Create a campaign”,
- Filter by the action “CRM Sync” to see all sequences that include this action,
- Select the sequence,
- Fill in the various fields (action, deadline, message content),
In the “CRM Sync” section :
- Select the CRM that you are going to configure,
- Paste the link of the Webhook previously copied,
- Click on “Test”, then “Validate”,
- Launch the campaign. 🚀

Step 3. Launch the Webhook
- Go back to Zapier, and pick up where you left off.
Now that the campaign has been launched, you can “Validate the Webhook” on Zapier.
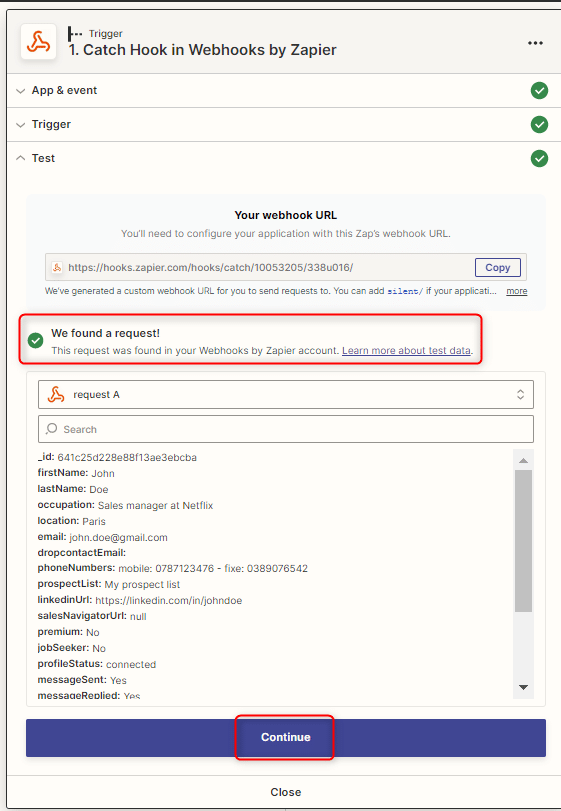

- Click on “Continue”,
Step 4. Synchronise Salesforce
- Click on the small “+” and search for “Salesforce”.
- Under “Event”, search for “Create Contact” and click “Continue”.
- Connect to your Salesforce account.
- Select the different variables in the fields you want to synchronize:
- In “Name”: select the variable “FirstName” and “LastName”, adding a space between the two.
Then fill in the different fields:

- Do this for all the data you wish to synchronise,
- Click on “Continue”, and “Test Action”,
- You should get a success message:

View on Salesforce
In Salesforce, you will find the imported contacts in “Contacts”:

Well done ! 😎